Mastering Zone Focusing: The Ultimate Guide for Street Photographers
If you’ve ever struggled to capture a fleeting street moment because your camera just couldn’t focus fast enough, zone focusing might be your new best friend. But what exactly is it, and why has it been beloved by street photographers for nearly a century? Let’s dive in.
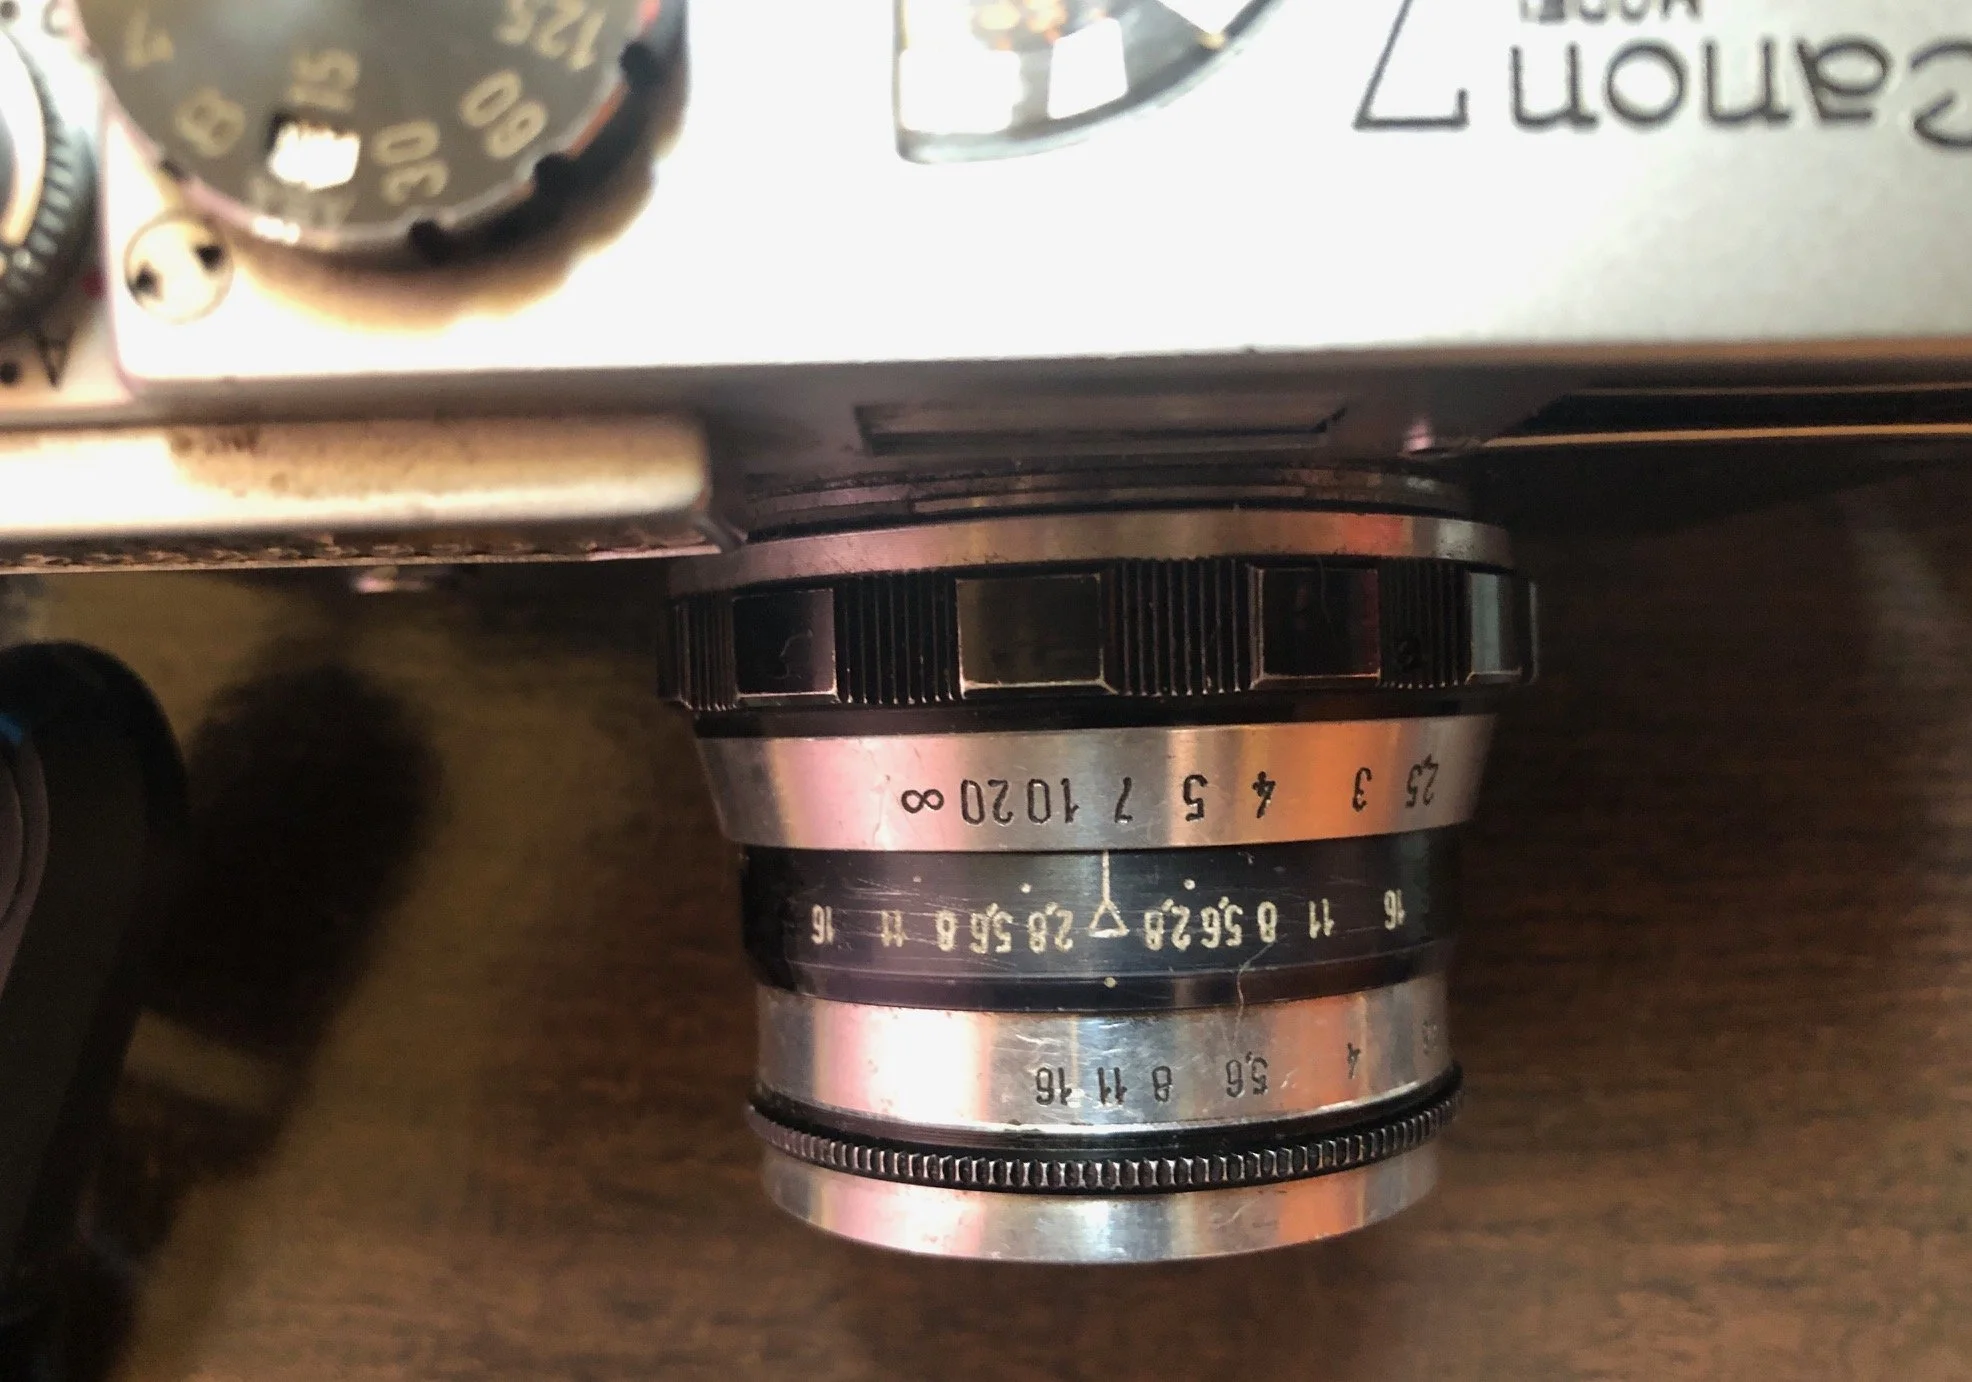
PLEASE NOTE: I'm sorry, but the measurement scale used here is meters, not feet.
What is Zone Focusing?
At its core, zone focusing is simple: pre-focus your lens to a specific distance or “zone” and use a small aperture to cover a range of distances in sharp focus. That way, anything within that zone will appear acceptably sharp, and you don’t have to wait for autofocus, or even touch it.
Imagine this: you’re walking down a busy street, your camera ready, and a subject enters your frame. Instead of your camera hunting for focus, you’ve already set a focus zone, and the shot is ready the moment it appears. That’s zone focusing.
From my experience as a street photographer, I’ve found that zone focusing is not just a technical shortcut: it’s a way to connect with the street itself. Walking with a pre-set zone forces you to observe, anticipate, and react instinctively. I often set my lens to cover the distances I know I’ll encounter most in the streets I shoot, usually between 2 and 5 meters. This lets me stay present, capturing gestures, glances, and fleeting moments without fumbling with autofocus. Zone focusing, for me, turns the chaotic unpredictability of the street into a manageable, almost playful challenge: where preparation and instinct meet.
A Brief History
Before autofocus was even a dream, street photographers relied on their eyes, instincts, and zone focusing.
Henri Cartier-Bresson, the master of the “decisive moment,” often used zone focusing to react instantly to unpredictable street scenes.
Garry Winogrand set his lenses in a pre-determined zone to capture chaotic city life without losing time fiddling with focus. Winogrand affirmed also the big difference between a rangefinder and a SLR cameras.*
Classic Leica rangefinder users often relied on distance scales on lenses, calculating depth of field for various apertures.
In short, zone focusing was the street photographer’s secret weapon long before technology caught up. Today, even with modern autofocus cameras, it’s still celebrated for speed, reliability, and creative control. And the message is clear: I don’t rely on AF that often mistakes what I want to focus, and it is me choosing what I want in focus.
*Garry Winogrand on Rangefinders vs SLRs
“With a rangefinder, you see more than what’s going to be in the picture. You see what’s coming into the frame and what’s leaving it. That’s very important to me: because the photograph doesn’t just happen inside the frame, it happens in relation to what’s outside of it too.”
“An SLR blacks out the moment you press the shutter, and that little blackout, that loss of sight, is a problem. You don’t see the thing you’re photographing at the very moment it happens.”
“I like to see beyond the edges. I want to know what’s happening around the picture, not just in it. The rangefinder lets me keep that connection with the world while I’m shooting.”
“Framing with a rangefinder feels natural. You’re not looking at a ground glass: you’re looking through it, at the world. The camera doesn’t separate you from what’s happening.”
Winogrand’s preference wasn’t just technical: it was philosophical. He believed that a photographer should remain in contact with reality while shooting, and the rangefinder allowed that. The SLR, by contrast, forced the photographer into a closed system, a view through a mirror that temporarily cut you off from the actual scene.
For Winogrand, seeing outside the frame was essential to his reactive, intuitive style. The rangefinder’s bright, frameline viewfinder became a tool for anticipation, for sensing movement entering or leaving the picture.
Zone Focusing Beyond Rangefinders
Garry Winogrand famously preferred rangefinder cameras because of their bright viewfinders and their ability to show what happens outside the frame: allowing anticipation, fluidity, and constant awareness of the street.
He was right: rangefinders make it easier to stay visually connected to the world while shooting. The framelines and direct optical view encourage a more intuitive, reactive rhythm.
However, zone focusing isn’t exclusive to rangefinders. It’s a technique rooted in optics, not in camera type. You can apply it just as effectively with a DSLR or mirrorless camera: you just need to adapt the way you visualize and set focus.
From Winogrand to My Street Photography
I’ve always appreciated what Garry Winogrand said about rangefinders: that clear window to the world, the ability to see what’s about to enter your frame. It makes sense, especially for someone who lives the street rather than simply documents it.
But in my experience, zone focusing isn’t a matter of camera ideology. It’s about rhythm, intuition, and readiness. I use it daily both with my Sony a6000 and the 7Artisans 25mm f/1.8, a mirrorless combo that gives me freedom and precision, and with my Canon 7 rangefinder, which brings that old-school immediacy Winogrand loved.
Each camera feels different in the hand, yes, but the approach, the mental map of distances, the confidence in your zone, stays the same. Whether you look through a digital EVF or a bright optical finder, zone focusing is a state of mind, not a specific piece of equipment.
How to Use Zone Focusing with a DSLR or Mirrorless Camera
Switch to Manual Focus Mode
Most modern cameras let you turn off autofocus entirely. This gives you full control over your focus point, just like with a rangefinder.Use Your Lens’s Distance Scale (if available)
Many prime lenses, even modern ones, have engraved or digital distance scales. Set the focus distance manually, for example, 3 meters at f/8 or f/11, to establish your zone.If Your Lens Lacks Markings
You can still do it by testing and memorizing distances. Focus on an object roughly 3 meters away, then stop down your aperture to increase depth of field. Apps like DOFMaster or PhotoPills can help you calculate exactly how much range will be in focus.Use Live View or Focus Peaking (Mirrorless Advantage)
Mirrorless cameras make zone focusing easier than ever. With focus peaking, you can literally see what part of your scene is within the sharp zone, making adjustments on the fly.Previsualize the Zone
Just as with a rangefinder, anticipate where subjects will enter your area of focus. Practice estimating distances: this skill matters more than the camera type.Shoot in Manual or Aperture Priority Mode
Choose small apertures like f/8 or f/11 for deep focus zones. Keep your shutter speed high enough to freeze motion: street life moves fast.
The Key Difference
With an SLR or DSLR, you don’t see outside the frame, and the viewfinder blacks out at the moment of exposure: the two things Winogrand disliked. But on the other hand, DSLRs and mirrorless systems offer precise control, focus aids, and real-time depth of field previews.
So while the experience may feel different, the principle of zone focusing, pre-focusing, anticipating, and reacting, remains identical. What matters most isn’t the viewfinder type, but the photographer’s awareness and understanding of distance, light, and timing.
The Takeaway
Rangefinders naturally lend themselves to zone focusing because of their design and philosophy. But the truth is, any camera can become a zone-focusing machine once you take control of focus and aperture.
What matters is not the camera’s mechanics, but your ability to predict the moment: to recognize where life will unfold and be ready before it happens. Technology has made significant strides, but while the multitude of autofocus points can be useful for specific types of photography, they're not as important for documentary and street photography. In fact, as this post aims to illustrate, I believe that manual focusing is still a great solution that completely influences and determines the result, not only technically but also aesthetically.
How Zone Focusing Works
Step 1: Pick Your Aperture
Depth of field (DoF) is your friend. A smaller aperture (f/8, f/11, f/16) gives you a wider zone of acceptable sharpness. The smaller the aperture, the bigger the zone.
Step 2: Choose Your Zone
Decide where you expect the action. For example:
Close street shots: Focus at 2m (f/8 covers ~1.5–3m)
Sidewalk interactions: Focus at 4m (f/11 covers ~3–6m)
Crowds or busy events: Focus at 5–10m (f/16 covers ~3–15m)
Pro tip: If your lens has distance markings, use them. If not, memorize approximate distances for your favorite shooting spots. Without a distance scale marked in the lens, we can yet zone focus. With a DSLR we can focus at a certain distance with AF activated, for example a wall with a graffiti or billboards. When the scene is in focus we can switch to MF. And don’t forget that new digital cameras count with the focus peak option that allow us to select a color (usually red) that shows outlines around in-focus subjects.
Step 3: Previsualize the Scene
Anticipation is key. Look for where subjects are likely to appear, and align your camera settings to cover that space. Zone focusing is as much mental as technical: you’re training yourself to see before shooting. When we start of course we fail. But more and more you get used to shoot using the zone focusing technique and more you master it. But don’t worry, I don’t nail all the shots even after years of experience.
Step 4: Shoot Instantly
Because your camera is pre-focused, you’re ready the moment life happens. No hunting, no lag, just quick, decisive shots.
Why Zone Focusing Works
Zone focusing leverages human anticipation over camera reaction. You aren’t trusting technology to catch the decisive moment; you’re predicting where life will happen and reacting instinctively.
It’s fast: No autofocus lag.
It’s reliable: Small aperture covers enough distance for most street scenarios.
It’s creative: Forces you to read the scene, plan your shot, and work with what’s coming instead of waiting for it.
Practical Examples
Here are some real-world situations where zone focusing shines:
1. Quick Candid Shots (ex. 1 subject in front of you)
Aperture: f/8
Focus Distance: 2m
Zone: 1.5–3m
Perfect for capturing gestures, conversations, or fleeting glances.
2. Busy Urban Sidewalks (ex. layering)
Aperture: f/11
Focus Distance: 4m
Zone: 3–6m
Covers multiple layers of people walking, passing, or interacting.
3. Crowds or Events (ex. a protest)
Aperture: f/16*
Focus Distance: 5–10m
Zone: 3–15m
Ideal for dense, chaotic scenes where you want multiple subjects in focus.Beware with f16 because of the diffraction issue, giving the image softer.
Mini Graphic Idea:
Think of it as a “focus donut”: the center of your lens’s focus distance is the middle, and the DoF spreads out on either side, forming a zone. Anything within that “donut” is sharp.
Common Mistakes
Too Wide Aperture: f/2 or f/2.8 = razor-thin zone, more misses than hits. That is why I recommend nopt going under f5.6.
Ignoring Distance Calculations: Know your lens’s coverage! A 35mm f/8 lens is very different from a 50mm f/8 in DoF.
Over-Reliance on Autofocus: AF is great, but on the street, it’s often too slow. Zone focusing trains your instincts.
When I use Zone Focusing
On the street, I mostly shoot with my Sony a6000 camera and the 7Artisans 25mm 1.8 manual lens, or sometimes with my Canon 7 rangefinder. Both setups allow me to pre-set focus quickly, react to moments instantly, and stay fully immersed in the scene rather than behind the camera. The compact size and manual control of these cameras make zone focusing a natural choice for capturing genuine street life.
With the Sony a6000 I turn off the LCD screen and working only through the EVF. I rely also on the focus peak and…boom, I shoot when framing the things I am interested are in focus. Usually with that lens:
Aperture: f/11
Focus Distance: 3m
Zone: ~2.1–~ ∞ We need to consider that 1m-1.5m will be soft, not completely in focus. But the 25mm on my Sony a6000 is an equivalente 37.5mm and I don’t shoot at the closest range on the street.
Fun Facts & Anecdotes
Cartier-Bresson said that the best autofocus is your own eyes and instincts.
Some photographers practiced “blind zone focusing,” walking streets with the lens set and shooting without looking through the viewfinde: training their reflexes and anticipation.
Zone focusing teaches patience and observation: sometimes the hardest part is waiting for the right subject to enter your pre-set zone.
Tools & Tips
Prime Lenses: 28mm, 35mm, 50mm. They’re fast, sharp, and have predictable depth of field.
Distance Markings: Use them if your lens has them. Otherwise, make your own cheat sheet.
Manual Focus & Peaking: Useful on modern mirrorless cameras. Focus once, then shoot like a ninja.
Practice: Start in quiet streets, then move to busier areas. Memorize common distances for your favorite shooting scenarios.
Extra Tip: Some photographers “pre-focus their zones for different scenarios” and switch between them while walking. Think of it like changing gears for life happening in front of you.
The Psychology of Zone Focusing
Zone focusing isn’t just a technical trick: it’s a mindset. It trains your anticipation, observation, and reaction. When done well, it feels almost magical: life enters your frame, perfectly timed, with zero fuss.
You’ll start to see the street differently. Instead of waiting for the camera to react, you’re already in the moment. And that, honestly, is where the magic of street photography happens.
The Philosophy Behind Zone Focusing
At first glance, zone focusing might seem like a purely technical method: a trick to ensure sharpness and speed. But once you start practicing it regularly, you realize it’s also a philosophy of seeing. It’s not about precision in the mechanical sense; it’s about clarity in the human sense.
When you set your focus manually and walk through the streets, you are making a quiet statement: I’m ready for whatever happens. You relinquish control over perfection and instead embrace the flow of reality. You stop chasing moments with your camera; you allow them to come to you. It is not the camera to see, it is you observing.
This mindset changes everything. Your attention shifts from the technical to the intuitive. You begin to observe gestures, rhythms, and interactions before they unfold. You are no longer just a photographer: you become a participant in the street’s choreography.
Zone focusing teaches patience and awareness. It reminds you that photography isn’t about catching everything in perfect detail, but about recognizing the essential when it appears. The frame becomes a stage, the street becomes your studio, and your preparation, that pre-set focus, becomes a silent collaboration with chance.
In a world obsessed with precision and automation, choosing to work this way is almost a form of resistance. You slow down to react faster. You give up the illusion of control to gain true connection. And that, perhaps, is what keeps the heart of street photography beating: the balance between instinct, imperfection, and timing.
How Zone Focusing Shapes the Aesthetic of Street Photography
Zone focusing doesn’t just change how you shoot: it changes how your photographs look and feel. When you stop relying on autofocus and start trusting your anticipation, your entire relationship with composition and timing transforms.
Because you’re no longer waiting for the camera, you become faster, more instinctive. You start to shoot in rhythm with the street, following its flow instead of controlling it. This shift has a direct visual impact: your images often feel more spontaneous, raw, and honest. The slight imperfection of manual focus, the subtle blur at the edges of your zone: they all contribute to an aesthetic that feels alive, not overproduced.
Working with zone focusing also influences the form of your photography. You begin to think spatially, in zones and layers, rather than through the narrow tunnel of a single focus point. You frame differently, because your attention is no longer locked on one precise subject. Instead, you compose for interaction, tension, and movement within a defined area of focus. It’s a way of shooting that encourages context over isolation, rhythm over perfection.
This aesthetic of “preparation and accident” has defined much of classic street photography: from Cartier-Bresson to contemporary street photographers who still prefer manual setups. Zone focusing makes you embrace the beautiful unpredictability of real life, and your photos carry that energy within them.
My direct experience
When I shoot with zone focusing, I’m not just setting a technical parameter, I’m shaping the form of the photograph. The technique becomes part of my language.
Because once you stop worrying about autofocus or precision in millimeters, your attention shifts entirely to what really matters: gesture, timing, light, energy.
I’ve learned that zone focusing gives a special kind of rhythm to my photography. The moment I pre-set the focus, I’m already inside the frame mentally, anticipating, composing, reacting instinctively. The camera becomes an extension of my presence, not a barrier.
Working this way affects the aesthetics too. You move faster, you frame quicker, you don’t hesitate. The pictures gain spontaneity, imperfection, and authenticity. There’s often a subtle softness in parts of the image, not everything is perfectly sharp, but that’s exactly what gives the photograph life. Reality isn’t sterile; it vibrates, it breathes, and that vibration enters the frame when you shoot this way.
Sure, you can try to do something similar with autofocus point control: selecting where you want the sharpness to fall, like on a middle plane of action, but it’s a slower, more mechanical process. On the street, that fraction of a second matters. And autofocus, especially with moving subjects, can easily miss the mark or shift when you don’t want it to.
With zone focusing, instead, the scene unfolds naturally inside your preset distance. You’re free to shoot when the moment happens: not when the camera decides to react.
When I use my Sony a6000 with the 7Artisans 25mm or my Canon 7 rangefinder, I’m not thinking about where the focus line falls: I’m thinking about where life happens. Zone focusing allows me to stay connected to the scene, to move within it, and to recognize that fleeting balance between form and emotion.
In the end, zone focusing isn’t just a focusing method: it’s a creative philosophy. It teaches you to trust your perception, to rely on instinct, and to accept that control isn’t everything. The image becomes more than a record; it becomes a reaction: raw, immediate, human. I talk often about the importance of presence in street photography, and I think that manual focus through the use of zone focusing is a great way to unfold my presence on the street.
Universal Street Zone Focusing Cheat Sheet
Close Street Interactions (1–3 m)
Use when photographing people up close, handshakes, faces, gestures.
Aperture Focus Distance In-Focus Range
f/4 2 m ~1.6 m → 2.5 m
f/5.6 2 m ~1.5 m → 2.8 m
f/8 2 m ~1.4 m → 3 m
Use when photographing people up close, handshakes, faces, gestures.
Mid-Distance / Typical Street Zone (2–6 m)
Great for capturing groups, interactions, or a small plaza scene.
Aperture Focus Distance In-Focus Range
f/5.6 3 m ~2.3 m → 4 m
f/8 3 m ~2.2 m → 4.7 m
f/11 3 m ~2.1 m → 5 m
Longer / General Street Zone (5 m → ∞)
Ideal for wider street scenes, architecture, layering or any situation where you want almost everything in the frame sharp.
Aperture Focus Distance In-Focus Range
f/8 8 m ~4 m → ∞
f/11 8 m ~4 m → ∞
f/16 5 m ~2.5 m → ∞
Tips for Universal Use
Smaller apertures (f/8–f/11) increase your zone without going to f/16 (helpful in low light).
Adjust focus distance depending on subject proximity: closer focus for gestures, farther for full scene coverage.
On APS-C / crop sensors, depth of field increases slightly compared to full-frame, giving you a slightly wider zone for the same distance/aperture.
Practice estimating distances by eye: it’s faster than fiddling with focus in the street.
Practive even at home, focusing on different objects to a different distance in order to become faster.
By using focus peaking in mirrorless camera, try to turn off the LCD screen and leaving only the EVF: that gives you a closer experience to shoot film.
Practical Street Tips & Workflow
Zone focusing isn’t just about the lens: it’s about YOUR PRESENCE:how you move, observe, and react on the street. Here’s how I approach it in real life:
1. Walking Through the Street with a Pre-Set Zone
I start every walk with a mental map of distances I want to cover. For example, I might pre-set my lens to a zone of 2–5 meters if I’m in a crowded plaza or 3–∞ meters for a wider street. This lets me stay mobile and present, without constantly thinking about focus. The camera is ready when the moment appears, not after it passes.
2. Anticipating Gestures and Interactions
Zone focusing forces you to look beyond your viewfinder. You start reading movement, body language, and rhythm. People don’t appear at random; they move, pause, interact. By anticipating where action will happen inside your focus zone, you capture fleeting moments naturally. Over time, this anticipation becomes instinct, you almost “predict” the photograph before it happens.
3. Switching Zones Quickly
Streets are dynamic. Sometimes you need a tighter zone for intimate gestures, other times a wider zone for a scene unfolding at multiple distances. I switch on the fly: stop down or open up the aperture, shift the focus distance slightly, and adjust shutter speed if needed. The key is to practice so your hands and eyes move together, making these adjustments seamless.
4. Handling Motion and Shutter Speed
A deep focus zone is only useful if your subjects are sharp. That means shutter speed matters. For fast pedestrians or moving vehicles, I keep it around 1/250s or faster, depending on distance and focal length. With slower subjects, I can push it lower. The combination of pre-set focus and correct shutter speed ensures that the moment is captured without guessing or chasing focus.
Zone Focusing vs Autofocus
Zone focusing and autofocus are both ways to get a sharp picture, but on the street, zone focusing often wins for speed and reliability.
Why Zone Focusing Is Faster
When you pre-set your focus, the camera is ready the instant the moment happens. There’s no hunting, no waiting for the lens to lock: your reaction is almost instantaneous. In crowded streets, that fraction of a second matters: a glance, a gesture, or a passerby crossing your frame can disappear in the blink of an eye. With zone focusing, you’re already prepared.
Where Autofocus Can Struggle
Autofocus isn’t perfect. It can fail in several common street scenarios:
Middle-plane action: If you want to capture something happening between two distances, AF can pick the wrong plane.
Fast-moving subjects: People walking quickly, children running, or cyclists passing can throw off AF, causing missed shots.
Low light: Contrast-based AF or even modern phase-detection can struggle when the street isn’t well lit, slowing you down or locking on incorrectly.
Sincerely I can say that the level of frustrations is higher when it depends of AF failure, while I can accept more because of my error.
Using AF Points if You Must
It’s still possible to use autofocus for street work, but it’s more cumbersome. You can select a single AF point or a small cluster to “approximate” your zone, but this requires more attention and adjustment, leaving less mental bandwidth for observing the scene. Compared to a pre-set manual zone, it’s easier to make errors: especially in fast-changing situations.
Advanced Tips & Hacks for Zone Focusing
Once you’ve mastered the basics, there are a few tricks that can take your zone focusing to the next level, helping you handle tricky light, dynamic subjects, and mirrorless tools.
1. Using Hyperfocal Distance in Tricky Light
Hyperfocal distance is your best friend when you want everything from a certain near point to infinity in focus. In bright conditions, it’s straightforward: pick your aperture, calculate your hyperfocal, and shoot.
In tricky light, early morning, late afternoon, or uneven shadows, you can adjust slightly: open one stop if you need faster shutter speed, or stop down slightly to extend depth of field. The key is to keep your focus distance near the hyperfocal so your zone remains predictable, even as light changes quickly.
2. “Focus Stacking” Mentally for Dynamic Scenes
On the street, things move fast. Sometimes you want two planes in focus: a person in the foreground and another interaction a few meters back. You can’t literally stack focus like in a studio, but you can do it mentally:
Pre-set one zone for near action.
Anticipate when subjects will enter the mid-plane.
Switch your preset quickly, either by moving the focus ring or adjusting aperture slightly.
With practice, this becomes instinctive: your brain and hands coordinate to capture multiple layers of action in sequence without missing the moment.
3. Combining Manual Focus + Peaking on Mirrorless
Mirrorless cameras give you extra visual feedback that makes zone focusing even more precise. Focus peaking highlights the sharpest areas in real time.
Pre-set your zone with manual focus.
Use peaking to confirm the nearest and farthest points of sharpness.
Adjust slightly if needed, especially for tricky subjects or narrow zones.
This combination lets you stay fast and reactive, while also double-checking that your zone is correct: perfect for unpredictable streets or low-contrast scenes.
In conclusion
Mastering zone focusing isn’t just about sharper photos: it’s about becoming faster, more instinctive, and deeply connected to the street. Once you get it, you’ll wonder how you ever relied solely on autofocus. Optical science is still a thing, despite technological advances. As long as we live on this planet, the laws of physics remain unchanged.
This is not a nostalgic or dinosaur post: as you could read I included tips on using even the new mirrorless cameras and how to take advantage of the AF (with DSLRs) and the focus peaking (with mirrorless) in order to pre-set focus your lens.
I just share my experience here but if you think AF is working better for your approach go with that. I think in photography one of the most important aspect is the component of fun, so enjoy photography in the way that makes it the most fun for you.